Protecting personal data when disposing of computers is crucial. Deleting files or formatting the hard drive isn’t sufficient. This guide covers effective methods to wipe your computer, including built-in tools, third-party software, and physical destruction, for both Windows and Mac systems. We’ll explore the most secure ways to make your sensitive information unrecoverable.
Understanding the Importance of Wiping Your Computer
Wiping your computer is a crucial step in maintaining data security and protecting your personal information. Unlike simply deleting files, which leaves data recoverable, wiping thoroughly erases all data, making it virtually impossible to retrieve. This process is essential for preventing identity theft and maintaining computer privacy, especially when selling, donating, or disposing of old devices.
Proper wiping techniques overwrite existing data with random information, ensuring that sensitive details like financial records, passwords, and personal documents are completely removed. This practice is particularly important in today’s digital age, where sophisticated data recovery tools can easily access improperly deleted information.
For businesses, wiping computers is not just a good practice but often a legal requirement to comply with data protection regulations. It helps safeguard corporate secrets, client information, and employee data from falling into the wrong hands.
Remember, protecting your digital footprint is as important as safeguarding physical documents. By understanding and implementing proper computer wiping techniques, you significantly reduce the risk of data breaches and maintain control over your personal information in the digital realm.
Preparing Your Computer for a Wipe
Before wiping your computer, it’s crucial to take several preparatory steps to ensure you don’t lose any valuable information. Start by performing a comprehensive data backup of all your important files. This can be done using an external hard drive, which provides a physical copy of your data, or through cloud storage services for added security and accessibility.
Don’t forget to save documents, photos, videos, and any other personal or work-related files you want to keep. Pay special attention to files stored in non-standard locations, such as custom folders or your desktop.
Next, make a list of all the software you currently have installed. Note down any product keys or license information, as you may need these to reinstall programs after the wipe. Many modern applications are linked to online accounts, so ensure you have login credentials for these services.
It’s also wise to export your browser bookmarks and save any stored passwords. Most browsers offer built-in tools for this purpose. Finally, if you use email clients like Outlook, export your emails and contacts to prevent any loss of communication history.
By taking these precautions, you’ll be well-prepared for a computer wipe, ensuring a smooth transition to your freshly cleaned system without the risk of losing valuable data or access to your essential software.
Different Methods to Wipe a Computer
When it comes to wiping a computer, several methods are available, each with its own level of effectiveness and complexity. One of the simplest approaches is performing a factory reset, which restores the device to its original state. This method is often sufficient for basic data removal but may not completely erase all traces of personal information.
For a more thorough cleanse, consider reinstalling the operating system. This process overwrites existing data and provides a fresh start for the computer. However, it’s important to note that some residual data may still be recoverable with specialized tools.
Data erasure software offers a more comprehensive solution. These programs use advanced algorithms to overwrite data multiple times, making it virtually impossible to recover. This method is often preferred by businesses and individuals dealing with sensitive information.
Disk formatting is another option, but its effectiveness varies depending on the type of formatting used. While quick formatting may not fully erase data, a full format can be more thorough. However, for maximum security, combining formatting with other methods is recommended.
Regardless of the chosen method, it’s crucial to back up important files before wiping a computer to prevent unintended data loss.
Step-by-Step Guide How to Wipe a Windows Computer
Wiping your Windows computer is a straightforward process, thanks to the built-in reset tool in Windows 10. Follow these steps to perform a complete wipe:
- Open the Start menu and click on the Settings icon.
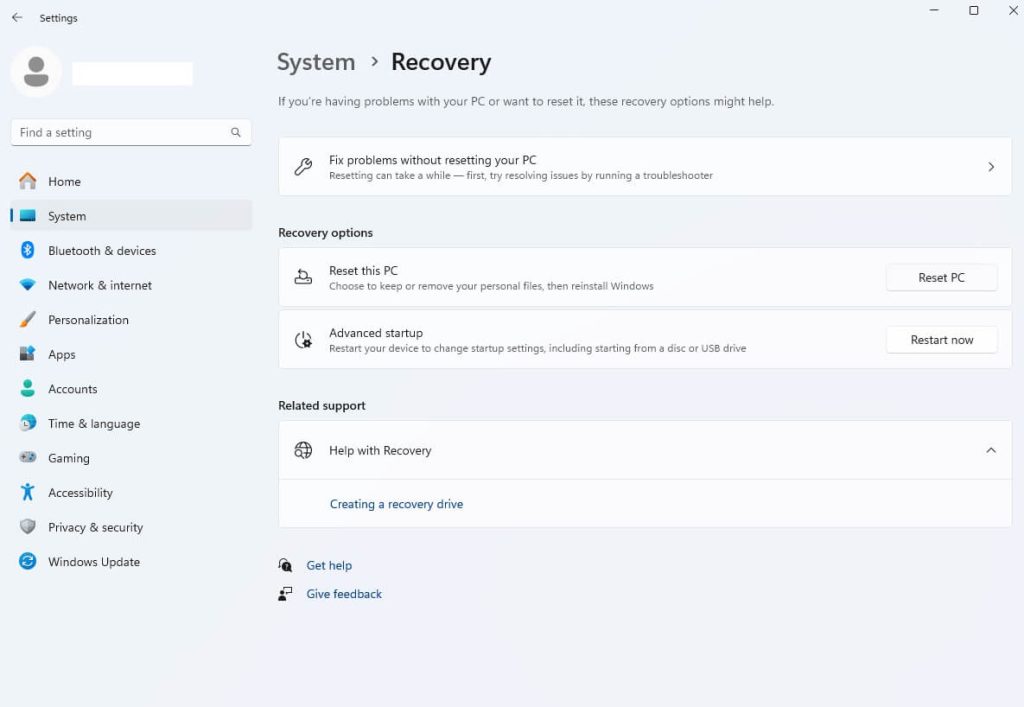
- Navigate to “Update & Security” and select “Recovery” from the left sidebar.
- Under “Reset this PC,” click the “Get started” button.
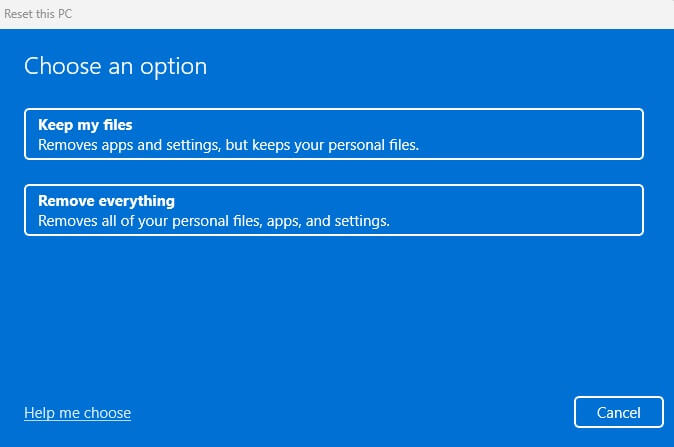
- Choose the “Remove everything” option to ensure a complete wipe.
- Select whether you want to reinstall Windows from the cloud or local storage.
- Click “Change settings” to enable data erasure for enhanced security.
- Review your choices and click “Next” to proceed.
- Finally, click “Reset” to begin the process.
The computer will restart several times during the reset. Once completed, you’ll have a clean installation of Windows 10, free from your personal data and previously installed programs. Remember to back up important files before initiating this process, as it permanently erases all data on the computer.
Step-by-Step Guide How to Wipe a Mac Computer
To wipe your Mac computer, follow these steps:
- Back up your data: Before proceeding, ensure all important files are backed up using Time Machine or another backup method.
- Sign out of iCloud and other accounts: Go to System Preferences and sign out of iCloud, iMessage, and other connected accounts.
- Restart in macOS Recovery mode: Turn off your Mac, then turn it on while holding Command + R until you see the Apple logo.
- Open Disk Utility: In the macOS Utilities window, select Disk Utility and click Continue.
- Erase the disk: Select your Mac’s internal drive (usually named “Macintosh HD”), click Erase, choose APFS as the format, and click Erase Volume Group.
- Exit Disk Utility: Once the erasure is complete, quit Disk Utility to return to the macOS Utilities screen.
- Reinstall macOS: Select “Reinstall macOS” and follow the on-screen instructions to install a fresh copy of the operating system.
- Set up your Mac: After installation, follow the setup assistant to configure your Mac as a new device.
By following these steps, you’ll have successfully wiped your Mac and prepared it for a fresh start or for a new user.
Using Third-Party Data Erasure Software
When it comes to securely erasing sensitive data from your devices, third-party data erasure software can be an invaluable tool. These programs go beyond simple file deletion, employing advanced techniques to ensure your data cannot be recovered.
One popular option is DBAN (Darik’s Boot and Nuke), which adheres to strict DoD standards for data destruction. DBAN overwrites every sector of your hard drive multiple times, making data recovery virtually impossible. This method of data overwriting is particularly effective for traditional hard disk drives.
Another widely used tool is CCleaner, which offers a secure erase feature alongside its system cleaning capabilities. CCleaner allows users to choose from various overwriting methods, including the rigorous 35-pass Gutmann method.
These software solutions provide a user-friendly interface for implementing professional-grade data erasure techniques, giving you peace of mind when disposing of old devices or preparing them for reuse. By utilizing such tools, you can ensure that your sensitive information remains protected, even after your device changes hands.
Physically Destroying the Hard Drive
Physically destroying a hard drive is one of the most secure methods of data destruction. This process ensures that sensitive information cannot be recovered, even with advanced data recovery techniques. Hard drive shredding is a popular method, where industrial-grade shredders reduce the drive to small metal fragments, making data retrieval virtually impossible.
Another effective technique is degaussing, which uses powerful magnetic fields to erase data by randomizing the magnetic domains on the disk. For those without access to specialized equipment, inflicting physical damage to the platters inside the hard drive can be an alternative. This can involve drilling holes through the drive, hammering it, or even subjecting it to extreme heat.
However, it’s crucial to note that these DIY methods may not guarantee complete data destruction and should be used with caution. Regardless of the chosen method, physically destroying a hard drive provides a high level of assurance that sensitive data will not fall into the wrong hands.
Verifying the Wipe
After performing a data wipe, it’s crucial to verify that all information has been completely erased. This step is often overlooked but is essential for ensuring data security. To verify a successful wipe, consider using data recovery software to scan the drive. These tools can detect any residual data that may have survived the wiping process.
Performing a residual data check is particularly important for sensitive information. Some advanced data recovery techniques can potentially retrieve data from incompletely wiped drives. By running a thorough verification, you can identify any lingering fragments of data and address them accordingly.
Secure erase verification tools are available that specifically check for remnants of data after a wipe. These specialized programs can provide a detailed report on the state of your storage device, giving you peace of mind that your information is truly gone.
Remember, verification is not just about confirming deletion – it’s about ensuring that your data cannot be reconstructed or accessed by unauthorized parties. Taking this extra step in the data erasure process can significantly enhance your overall data security strategy.
What to Do After Wiping Your Computer
After wiping your computer, several crucial steps are necessary to ensure it’s fully functional and secure. Begin by reinstalling the operating system, which forms the foundation of your computer’s functionality. Once the OS is in place, focus on updating all drivers to ensure optimal performance of hardware components.
Next, install essential software applications, including antivirus programs, productivity tools, and any specialized software you regularly use. This process may take some time, but it’s vital for restoring your computer’s capabilities.
If you’ve backed up your data prior to wiping, now is the time for data restoration. Carefully transfer your files, documents, and settings back to your freshly wiped computer. Be selective in this process to avoid reintroducing any potential issues that led to the wipe in the first place.
Remember to configure your settings, customize your desktop, and organize your files as you restore them. Finally, run a comprehensive system scan to ensure everything is working correctly and your computer is free from any lingering issues or malware.